*During the* [*Pwn2Own Tokyo*](https://www.zerodayinitiative.com/blog/2019/11/7/pwn2own-tokyo-2019-day-two-final-results) *competition last fall, Pedro Ribeiro (@pedrib1337) and Radek Domanski (@RabbitPro) used a command injection vulnerability as a part of the exploit chain they used to gain code execution on a TP-Link Archer A7 wireless router, which earned them $5,000. The bug used in this exploit was recently patched, and Pedro and Radek have graciously put together this blog post describing the command injection vulnerability.*
------
This article describes a command injection vulnerability that we found and presented at the Pwn2Own Tokyo competition in November 2019.
The vulnerability exists in the tdpServer daemon (`/usr/bin/tdpServer`), running on the TP- Link Archer A7 (AC1750) router, hardware version 5, MIPS Architecture, firmware version 190726. This vulnerability can only be exploited by an attacker on the LAN side of the router, but authentication is not necessary. After exploitation, an attacker is able to execute any command as root, including downloading and executing a binary from another host. This vulnerability was assigned CVE-2020-10882 and was addressed by TP-Link with firmware version [A7(US)_V5_200220](https://www.tp-link.com/us/support/download/archer-a7/).
All function offsets and code snippets in this article are taken from `/usr/bin/tdpServer`, firmware version 190726.
**Background on tdpServer**
The `tdpServer` daemon listens on UDP port 20002 on interface 0.0.0.0. The overall functionality of the daemon is not fully understood by the authors at this point, as this was unnecessary for exploitation. However, the daemon seems to be a bridge between the TP-Link mobile application and the router, allowing establishment of some sort of control channel from the mobile application.
The daemon communicates with the mobile application through the use of UDP packets with an encrypted payload. We reversed the packet format, and it is shown below:
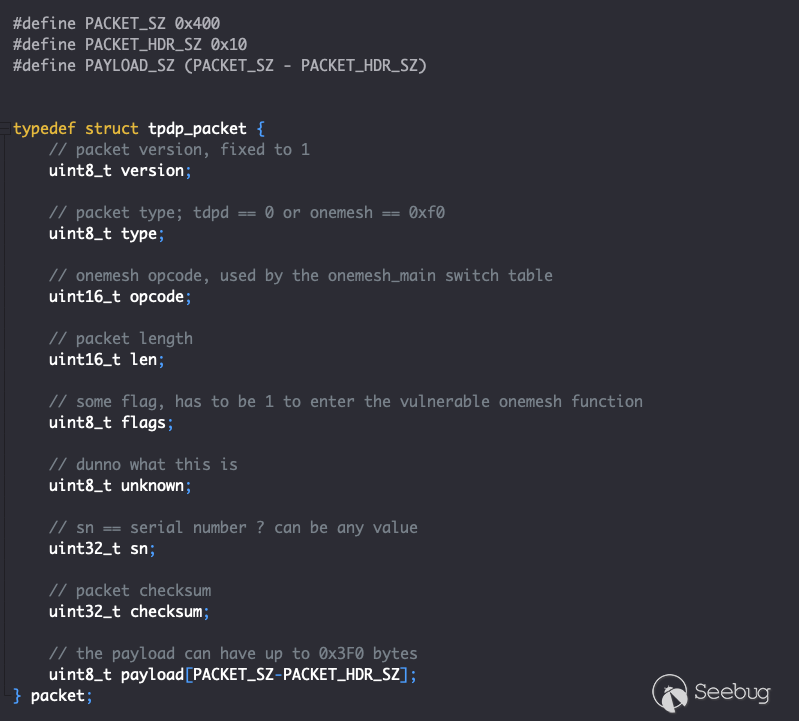
*Figure 1 - Reversed tdpServer packet format*
The packet type determines what service in the daemon will be invoked. A type of 1 will cause the daemon to invoke the *tdpd* service, which will simply reply with a packet with a certain TETHER_KEY hash value. Because this is not relevant to the vulnerability, we did not investigate it in detail.
The other possible type is 0xf0, which invokes the *onemesh* service. This service is where the vulnerability lies.
[*OneMesh*](https://www.tp-link.com/us/onemesh/compatibility/) appears to be a proprietary mesh technology that was introduced by TP-Link in recent firmware versions for a number of their routers.
The other fields in the packet are relatively well explained in the comments above.
**Understanding the Vulnerability**
Upon device start-up, the first relevant function invoked is *tdpd_pkt_handler_loop()* (offset 0x40d164), which opens a UDP socket listening on port 20002. Once a packet is received, this function passes the packet to *tpdp_pkt_parser()* (0x40cfe0), of which a snippet is shown below:
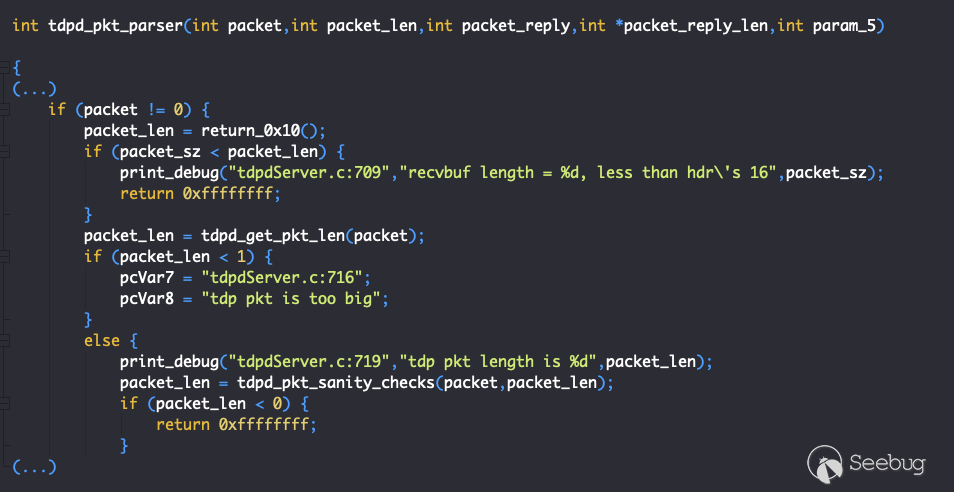
*Figure 2 - tdpd_pkt_parser() #1*
In this first snippet, we see that the parser first checks to see if the packet size as reported by the UDP socket is at least 0x10, which is the size of the header. Then it invokes *tdpd_get_pkt_len()* (0x40d620), which returns the length of the packet as declared in the packet header (*len* field). This function returns -1 if the packet length exceeds 0x410.
The final check will be done by *tdpd_pkt_sanity_checks()* (0x40c9d0), which will not be shown for brevity, but does two verifications. First, it checks if the packet version (*version* field, the first byte in the packet) is equal to 1. Next, it calculates a checksum of the packet using a custom checksum function: *tpdp_pkt_calc_checksum()* (0x4037f0).
To better understand what is happening, the following function is *calc_checksum()*, which is part of the **lao_bomb** exploit code. This is shown in place of *tpdp_pkt_calc_checksum()* as it is easier to understand.

*Figure 3 - calc_checksum() from the lao_bomb exploit code*
The checksum calculation is quite straightforward. It starts by setting a *magic* variable of `0x5a6b7c8d` in the packet’s checksum field, and then uses *reference_tbl*, a table with 1024 bytes, to calculate the checksum over the whole packet, including the header.
Once the checksum is verified and all is correct, *tdpd_pkt_sanity_checks()* returns 0, and we then enter the next part of *tdpd_pkt_parser()*:

*Figure 4 - tdpd_pkt_parser() #2*
Here the second byte of the packet, the *type* field, is checked to see if it is 0 (tdpd) or 0xf0 (onemesh). In the latter branch, it also checks if the global variable *onemesh_flag* is set to 1, which it is by default. This is the branch we want to follow. We then enter *onemesh_main()* (0x40cd78).
*onemesh_main()* won’t be shown here for brevity, but its job is to invoke another function based on the packet’s *opcode* field. In order to reach our vulnerable function, the *opcode* field has to be set to 6, and the *flags* field has to be set to 1. In this case, *onemesh_slave_key_offer()* (0x414d14) will be invoked.
This is our vulnerable function, and as it is very long, only the relevant parts will be shown.
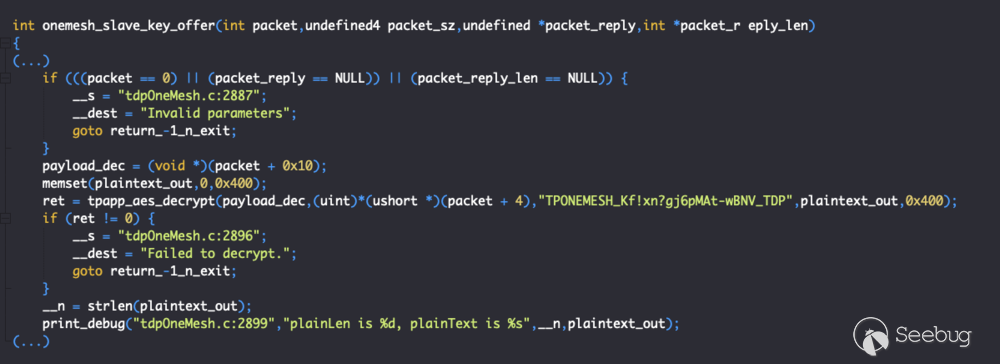
*Figure 5 - onemesh_slave_key_offer() #1*
In this first snippet of *onemesh_slave_key_offer()*, we see that it passes the packet payload to *tpapp_aes_decrypt()* (0x40b190). This function will also not be shown for brevity, but it’s easy to understand what it does from the name and its arguments: it decrypts the packet payload using the AES algorithm and the static key *“TPONEMESH_Kf!xn?gj6pMAt-wBNV_TDP”*.
This encryption was complicated to replicate in the lao_bomb exploit. We will explain this in detail in the next section.
For now, we will assume that *tpapp_aes_decrypt* was able to decrypt the packet successfully, so we move on to the next relevant snippet in *onemesh_slave_key_offer()*:

*Figure 6- onemesh_slave_key_offer() #2*
In this snippet, we see some other functions being called (basically the setup of the onemesh object) followed by the start of the parsing of the actual packet payload.
The expected payload is a JSON object, such as the one shown below:

*Figure 7 - Example JSON payload for onemesh_slave_key_offer()*
In Figure 6, we can see the code first fetching the *method* JSON key and its value, and then the start of the parsed *data* JSON object.
The next snippet shows that each key of the *data* object is processed in order. If one of the required keys does not exist, the function simply exits:

*Figure 8 - onemesh_slave_key_offer() #3*
As it can be seen above, the value of each JSON key is parsed and then copied into a stack variable (*slaveMac*, *slaveIp*, etc).
After parsing the JSON object, the function starts preparing the response by invoking *create_csjon_obj()* (0x405fe8).
From here onwards, the function performs a variety of operations on the received data. The part that matters is shown below:
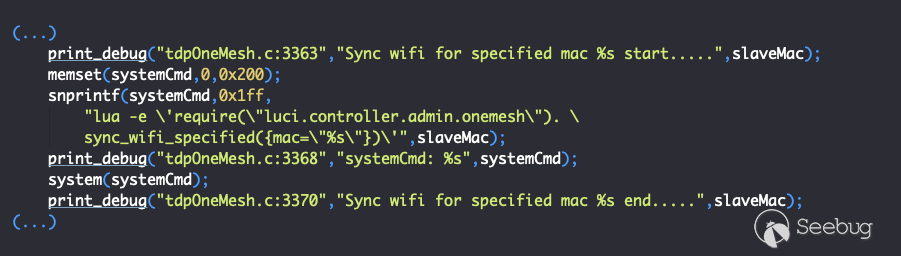
*Figure 9 - onemesh_slave_key_offer() #4*
And here is our vulnerability in its full glory. Referring back to Figure 8 above, you can see that the value of the JSON key *slave_mac* was copied into the *slaveMac* stack variable. In Figure 9, *slaveMac* is copied by *sprintf* into the *systemCmd* variable that is then passed to *system()*.
**Exploitation**
**Reaching the Vulnerable Function**
The first thing to determine is how to reach this command injection. After trial and error, we found out that sending the JSON structure shown in Figure 7 above always hits the vulnerable code path. In particular, *method* has to be *slave_key_offer*, and *want_to_join* has to be *false*. The other values can be chosen arbitrarily, although some special characters in fields other than *slave_mac* might cause the vulnerable function to exit early and not process our injection.
With regards to the packet header, as previously described, we have to set *type* to 0xf0, *opcode* to 6 and *flags* to 1, as well as get the *checksum* field correct.
**Encrypting the Packet**
As explained in the previous section, the packet is encrypted with AES with a fixed key of `TPONEMESH_Kf!xn?gj6pMAt-wBNV_TDP`. There are a few more missing pieces to this puzzle, though. The cipher is used in CBC mode and the IV is the fixed value `1234567890abcdef1234567890abcdef`. Furthermore, despite having a 256-bit key and IV, the actual algorithm used is AES-CBC with a 128-bit key, so half of the key and IV are not used.
**Achieving Code Execution**
Now we know how to hit the vulnerable code path, can we just send a packet with a command and get code execution? There are two problems to overcome:
i. The strncpy() only copies 0x11 bytes from the *slave_mac_info* key into the *slaveMac* variable, and that includes the terminating null byte.
ii. We need to perform some escaping, since the value in *slaveMac* will be enclosed in both single and double quotes.
With these two constraints in mind, the actual available space is quite limited.
In order to escape the arguments and execute a payload, we have to add the following characters:
`';<PAYLOAD>'`
We have just lost 3 characters, leaving us with only 13 bytes to construct our payload. With 13 bytes (characters), it’s pretty much impossible to execute anything meaningful.
In addition, we found through testing that the limit is actually 12 bytes. We did not fully understand why, but it appears it has to do with the escaping.
Our solution was to trigger the bug many times, building up a desired command file on the target one character at a time. Then we trigger the bug one final time to execute the command file as a shell script. Even so, this technique is a lot more difficult than it looks at a first glance.
Consider, for example, that to append a character ‘a’ to a file named ‘z’, we can simply do this:
`cat 'a'>>z`
Notice how even this simple case requires 10 bytes.
If we want to write a digit, the technique shown above does not work. This is because a digit is interpreted by the shell as a file descriptor. Similarly, special characters such as ‘.’ or ‘;’ that are interpreted by the shell cannot be written to a file using the method above. To handle these cases, we need to do the following:
`printf '1'>x`
If you notice, this actually does not append a character to an existing file but instead creates a new file named ‘x’ (overwriting any existing file by that name) containing just the character ‘1’. Since this payload is already 12 characters long, there is no way to add an extra ‘>’ that would allow us to append the `1` to the command file we are building.
Nevertheless, there is a solution. Every time we need to emit a digit or special character, we first write the character to a new file, and afterwards use cat to append the contents of this new file to the command file being built:
`cat x*>>z*`
You might wonder why we need the ‘*’ at the end of each file name. That’s because despite the fact that we always escape the command we send, the last few bytes of the lua script that was supposed to be executed end up in the file name. This means that when we try to create a file named ‘z’, in reality it will be named ‘z”})’. Adding the full filename into our command would consume too many bytes. Luckily for us, the shell does autocompletion with the special ‘*’ character.
Astute readers will notice that we did not change to */tmp*, as it is many times necessary in embedded devices, as the filesystem root is usually not writeable. Again, we were lucky. The root filesystem is mounted read-write, which is a major security mistake by TP-Link. Had it been mounted read-only, as is normal in most embedded devices that use the SquashFS filesystem, this particular attack would have been impossible, as adding `cd tmp` would consume too many of the available 12 characters.
And with this, we have all the tools we need to execute arbitrary commands. We send the command byte by byte, adding them to a command file ‘z’, and then we send the payload:
`sh z`
and our command file gets executed as root. From here on, we can download and execute a binary, and we have full control of the router.
------
*Users of TP-Link routers with support questions can email* [*support.email@tp-link.com*](mailto:support.email@tp-link.com)*. Thanks again to Pedro and Radek for providing this great write-up. This duo has competed in multiple Pwn2Own competitions, including winning $75,000 at this year’s Pwn2Own Miami event. We certainly hope to see more from them in future competitions. Until then, follow the* [*team*](https://twitter.com/thezdi) *for the latest in exploit techniques and security patches.*


 京ICP备10040895号
暂无评论